The Ultimate Guide to Choosing the Right Robotic Arm:
Navigating Your Options with Confidence
Feeling overwhelmed by the large variety of robotic arms on the market? You’re not alone. How to choose an appropriate robotic arm? Selecting the perfect robotic arm isn’t just about finding the shiniest model or the biggest brand; it’s about meticulously matching technology to your specific needs. This comprehensive guide cuts through the complexity, providing a structured approach to help you make an informed, confident decision that delivers real value.
Step 1: Define Your Core Mission (What Problem Are You Solving?)
Before diving into specs, start with fundamental questions:
- Primary Task: What exactly will the arm do? (e.g., precise assembly, heavy palletizing, delicate lab testing, intricate welding, consistent dispensing, machine tending, collaborative assistance).
- Payload & Dynamics: What is the maximum weight the arm needs to lift at its furthest reach? Consider not just the part, but also end-of-arm-tooling (EOAT) like grippers, sensors, or welding torches. Also, think about speed and acceleration – is rapid movement critical, or is smooth, precise motion more important?
- Reach & Workspace: What volume of space does the arm need to cover? Measure the maximum distance from the mounting point to the furthest required point (reach), and the overall 3D area it needs to access (workspace). Consider mounting options (floor, ceiling, wall, mobile base).
- Precision & Repeatability: How critical is accuracy? Repeatability (how consistently it returns to the same point) is often more crucial than absolute accuracy (how close it gets to a commanded point). Think in microns or millimeters. Tasks like PCB assembly demand high repeatability.
- Environment: Will it operate in a clean lab, a dusty warehouse, a washdown area (IP67+), near strong electromagnetic fields, or in explosive atmospheres? Environmental factors dictate critical design features.
Step 2: Understand the Major Categories (Industrial vs. Collaborative)
The market primarily splits into two distinct types:
Traditional Industrial Robots (IRs):
- Strengths: Highest payloads (often 100kg+), longest reaches (several meters), highest speeds, robust construction for harsh environments, best suited for heavy-duty, high-speed, dangerous tasks. Often enclosed in safety cages.
- Ideal For: Automotive assembly lines, heavy palletizing/depalletizing, large-scale welding, foundry applications, high-volume machine tending.
- Considerations: Typically require significant safety infrastructure (fencing, light curtains), complex programming often needing specialists, higher initial cost and integration complexity. Less flexible for frequent task changes.
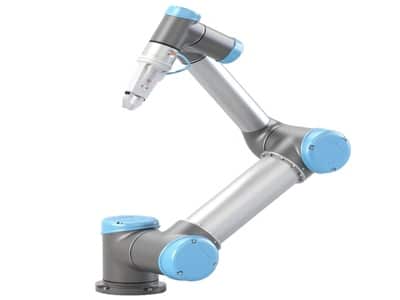
Collaborative Robots (Cobots):
- Strengths: Designed for safe interaction with humans (power/force limiting, rounded edges, sensors), easier programming (often intuitive, hand-guiding), flexibility for frequent task changes, lower initial cost, typically easier to integrate and redeploy.
- Ideal For: Precision assembly (electronics, medical devices), packaging, quality inspection, lab automation, machine tending on smaller CNC machines, tasks requiring close human-robot interaction (hand-offs, assisted assembly), lower-volume/high-mix production.
- Considerations: Lower payload capacity (usually < 20kg, though increasing), shorter reach, slower speeds compared to IRs, may still require risk assessments and potentially some safeguarding depending on the task and tooling.
Step 3: Deep Dive into Critical Technical Specifications
Now, match your mission requirements to hard specs:
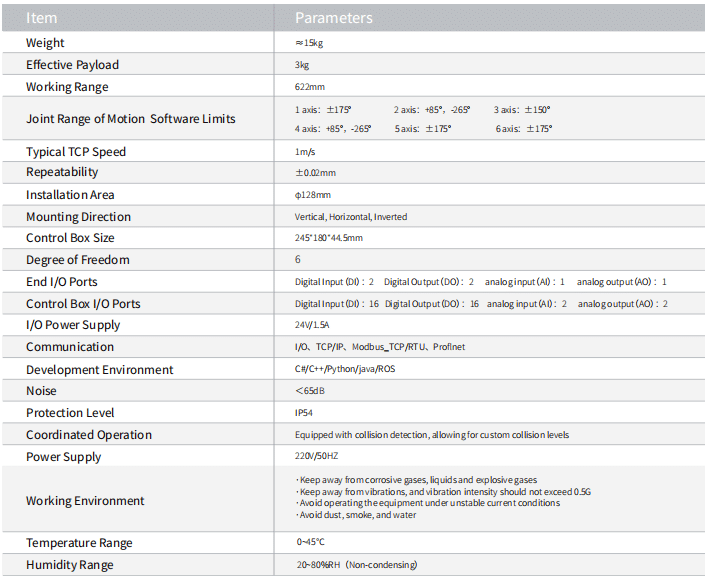
- Payload Capacity (kg/lbs): Crucial. Never max out the arm constantly. Aim for the arm’s payload to be 1.5x to 2x your total payload (part + EOAT). Exceeding it drastically reduces lifespan and precision. (Example: If your part + gripper weighs 8kg, choose a cobot rated for at least 12kg, preferably 15-16kg).
- Reach (mm/in): Ensure the arm can comfortably reach all points in the required workspace at the necessary orientations. Consider the robot’s footprint and mounting. Remember, usable workspace is often less than the maximum reach sphere due to joint limits. Tip: Visualize the arm mounted, then imagine a laser pointer at the wrist flange – can it point everywhere needed?
- Repeatability (mm/in): This is the golden metric for precision tasks. Standard industrial arms can achieve ±0.02mm or better, while cobots often range from ±0.03mm to ±0.1mm. Choose based on your tolerance requirements. (Data Point: Precision electronics assembly might require < ±0.05mm, while palletizing might be fine with ±0.5mm).
- Degrees of Freedom (DoF): 6 DoF (like a human arm) is standard for full flexibility. 4 DoF (SCARA) arms excel at fast, precise movements in a horizontal plane (ideal for pick-and-place, simple assembly). 7 DoF arms offer enhanced dexterity for complex paths or confined spaces but are more complex to program.
- Speed (deg/s, m/s): Consider cycle time requirements. While max speed is advertised, sustained speed under load and acceleration/deceleration profiles are more important for real-world throughput. Cobots are generally slower than IRs but sufficient for many tasks.
- Protection Rating (IP Code): Essential for environment. IP54 (dust and splash resistant) is common for factories. IP65 (dust-tight, low-pressure water jets) for more demanding environments. IP67 (immersion resistant) for washdown. Cleanroom (ISO Class) ratings for sensitive environments.
Step 4: Consider the Ecosystem (Beyond the Arm Itself)
The arm is just the core. Success hinges on the surrounding ecosystem:
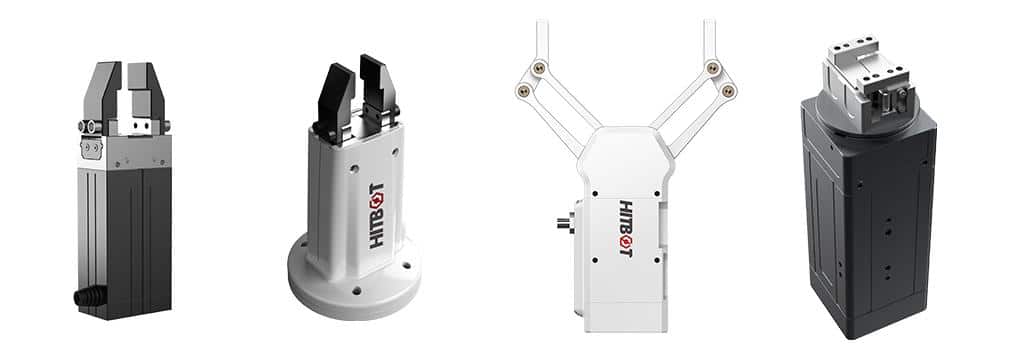
- End-of-Arm Tooling: Grippers (electric, mechanical, vacuum, magnetic, soft), sensors (vision, force/torque), welding torches, dispensers. Compatibility, weight, and control integration are vital. Factor EOAT cost (often 25-50%+ of arm cost).
- Programming & Control: How easy is it to program? Does it offer intuitive interfaces (hand-guiding, graphical blocks), scripting (Python), or traditional coding? Is offline programming (simulation) supported? How is the user interface? Ease of use significantly impacts deployment time and flexibility.
- Integration: How easily does the arm connect to other machines (PLCs, vision systems, conveyors)? Look for standard communication protocols (Ethernet/IP, Profinet, Modbus TCP, digital I/O). Controller size and mounting matter.
- Software & Connectivity: Does the vendor offer advanced features (vision guidance libraries, force control applications, data analytics)? Is there cloud connectivity for monitoring? Support for ROS/ROS 2 can be a plus for research or complex applications.
- Safety Features: Beyond inherent cobot safety, what additional safety functions are available (safety-rated monitored stop, speed and separation monitoring)? What certifications does it hold (ISO 10218, ISO/TS 15066)? Conduct a thorough risk assessment regardless.
Step 5: Application Spotlights (Matching Arm to Task)
Precision Assembly (Electronics, Medical Devices): Prioritize high repeatability (±0.05mm or better), 6 DoF dexterity, integrated force sensing for delicate insertion, cleanroom compatibility. Cobots are often ideal here.
Palletizing/Depalletizing: Focus on high payload capacity (match the heaviest bag/box + gripper), long reach, speed (cycles/hour), robustness (IP54 min). Traditional IRs dominate heavy loads, cobots handle lighter cases. Machine Tending (CNC, Injection Molding): Requires reliability, medium payload/reach, ease of programming for part changes. Cycle time must sync with the machine. Both IRs and cobots excel; cobots offer easier redeployment between different machines. (Example: ABB IRB 1600 tending multiple CNC lathes).
Arc Welding: Needs high path repeatability, process-specific software, compatibility with welding power sources, often higher payload for the torch. Dedicated industrial welding robots are common. (Example: Yaskawa Motoman MA1440 with integrated welding package).
Laboratory Automation (Liquid Handling, Sample Prep): Demands high precision, cleanroom compatibility (ISO Class 5+), small footprint, smooth motion, easy decontamination. Smaller cobots or specialized lab robots are key. (Example: Stäubli TX2-60 in a pharmaceutical lab).
Packaging & Pick-and-Place: Speed and reliability are king. SCARA arms are often perfect for fast, planar motions. Cobots offer flexibility for varied product sizes. (Example: Epson T-Series SCARA placing items into blister packs at high speed).
Quality Inspection & Testing: Requires integration with vision systems (2D/3D cameras), precise positioning, potentially force sensing. Cobots are popular for their ease of sensor integration and deployment. (Example: Techman TM cobot with integrated camera performing surface defect inspection).
Additive Manufacturing (3D Printing – Robotic): Needs large workspace, good path accuracy at varying speeds, high-temperature tolerance near the print head, and often high DoF for complex geometries. Larger industrial arms are typical. (Example: KUKA KR QUANTEC extruding large-scale concrete structures).
Step 6: Financial Considerations & Future-Proofing
Total Cost of Ownership (TCO): Look beyond the arm’s sticker price. Include: EOAT, integration engineering, safety systems, programming time, maintenance, training, and potential facility modifications. Cobots often have lower upfront integration costs but may have higher arm cost per kg payload.
ROI Calculation: Estimate labor savings (hours saved labor cost/hour), quality improvements (reduced scrap/rework), increased throughput, and uptime gains. Divide the TCO by the annual savings to get payback period. (Example: Replacing 2 shifts of manual labor @ $25/hr saving $70k/year. TCO of $100k = ~17 month payback). Data Insight: Industry surveys suggest average cobot payback periods are often between 6-18 months.
Scalability & Flexibility: Can the arm be easily redeployed for new tasks? Does the vendor offer a range of arms? Is the software platform adaptable? Choosing a system that can grow or adapt with your needs protects your investment.
Vendor Support & Ecosystem: Strong technical support, training availability, application expertise, and a network of experienced integrators are invaluable. Check warranty terms and spare parts availability. A vibrant user community is a plus.
Conclusion: Your Path to Robotic Success
Choosing the right robotic arm is a strategic investment. By rigorously defining your needs, understanding the fundamental differences between arm types, meticulously evaluating technical specs and the broader ecosystem, and aligning these with specific applications and financial realities, you transform confusion into clarity.
Don’t rush the process. Leverage vendor demos and application labs. Talk to peers in your industry. Consult with experienced system integrators. The most “advanced” arm isn’t automatically the best; the right arm is the one that seamlessly integrates into your workflow, solves your specific problem efficiently and reliably, and delivers a compelling return on investment for years to come. Start your journey with a clear mission, and you’ll find the perfect robotic partner to elevate your operations.